A tabela abaixo mostra as peças utilizadas e seus valores FOB (Free on Board). Note que estes valores são reais para preços na China, excluindo impostos e frete. Não inclui pilhas, mas mesmo assim, é possível montar um robô completo com processador RISC-V de 32 bits, Wi-Fi e Bluetooth por apenas $10! The table below shows the parts used and their FOB (Free on Board) values. Note that these values are real for prices in China, excluding taxes and shipping. It doesn't include batteries, but even so, it's possible to assemble a complete robot with a 32-bit RISC-V processor, Wi-Fi and Bluetooth for just $10! La siguiente tabla muestra las piezas utilizadas y sus valores FOB (Free on Board). Tenga en cuenta que estos valores son reales para los precios en China, excluyendo impuestos y envío. No incluye baterías, pero aun así, ¡es posible montar un robot completo con un procesador RISC-V de 32 bits, Wi-Fi y Bluetooth por solo $10! Die folgende Tabelle zeigt die verwendeten Teile und ihre FOB-Werte (Free on Board). Beachten Sie, dass diese Werte für Preise in China gelten, ohne Steuern und Versand. Batterien sind nicht enthalten, aber dennoch ist es möglich, einen kompletten Roboter com einem 32-Bit-RISC-V-Prozessor, Wi-Fi und Bluetooth für nur 10 $ zusammenzubauen!
Os dez dólares são para uma versão inicial com 2 motores e um ESP32C3. Isso é suficiente para o robô se mover via controle remoto ou programação (BIPES, AIPES, etc). O SancaBot é modular, então você pode adicionar sensores e expandir suas funcionalidades conforme sua necessidade. The ten dollars is for an initial version with 2 motors and an ESP32C3. This is sufficient for the robot to move via remote control or programming (BIPES, AIPES, etc). SancaBot is modular, so you can add sensors and expand its functionalities as needed. Los diez dólares son para una versión inicial con 2 motores y un ESP32C3. Esto es suficiente para que el robot se mueva por control remoto o programación (BIPES, AIPES, etc.). SancaBot es modular, por lo que puede añadir sensores y ampliar sus funcionalidades según sus necesidades. Die zehn Dollar gelten für eine Einstiegsversion mit 2 Motoren und einem ESP32C3. Dies reicht aus, damit sich der Roboter per Fernbedienung oder Programmierung (BIPES, AIPES usw.) bewegen kann. SancaBot ist modular aufgebaut, sodass Sie je nach Bedarf Sensoren hinzufügen und seine Funktionen erweitern können.
Lista de Peças Parts List Lista de Piezas Teileliste
| Item | DescriçãoDescriptionDescripciónBeschreibung | Qtd | Valor (US$ FOB)Value (US$ FOB)Valor (US$ FOB)Wert (US$ FOB) |
|---|---|---|---|
| 1 | ESP32C3 Super Mini module (*) | 1 | US$ 2,10 |
| 2 | ESP32 C3 Super Mini Terminal Shield Expansion Board (*) | 1 | US$ 1,50 |
| 3 | Holder for 3 or 4 AA batteries | 1 | US$ 1,10 |
| 4 | Micro servo motor with 360-degree continuous rotation | 2 | US$ 4,80 |
| 5 | Robot mechanical assembly parts (3D Printed) | 1 | US$ 0,40 |
| 6 | 2-way connector | 1 | US$ 0,10 |
| TOTAL | US$ 10,00 | ||
Filosofia do Projeto Project Philosophy Filosofía del Proyecto Projektphilosophie
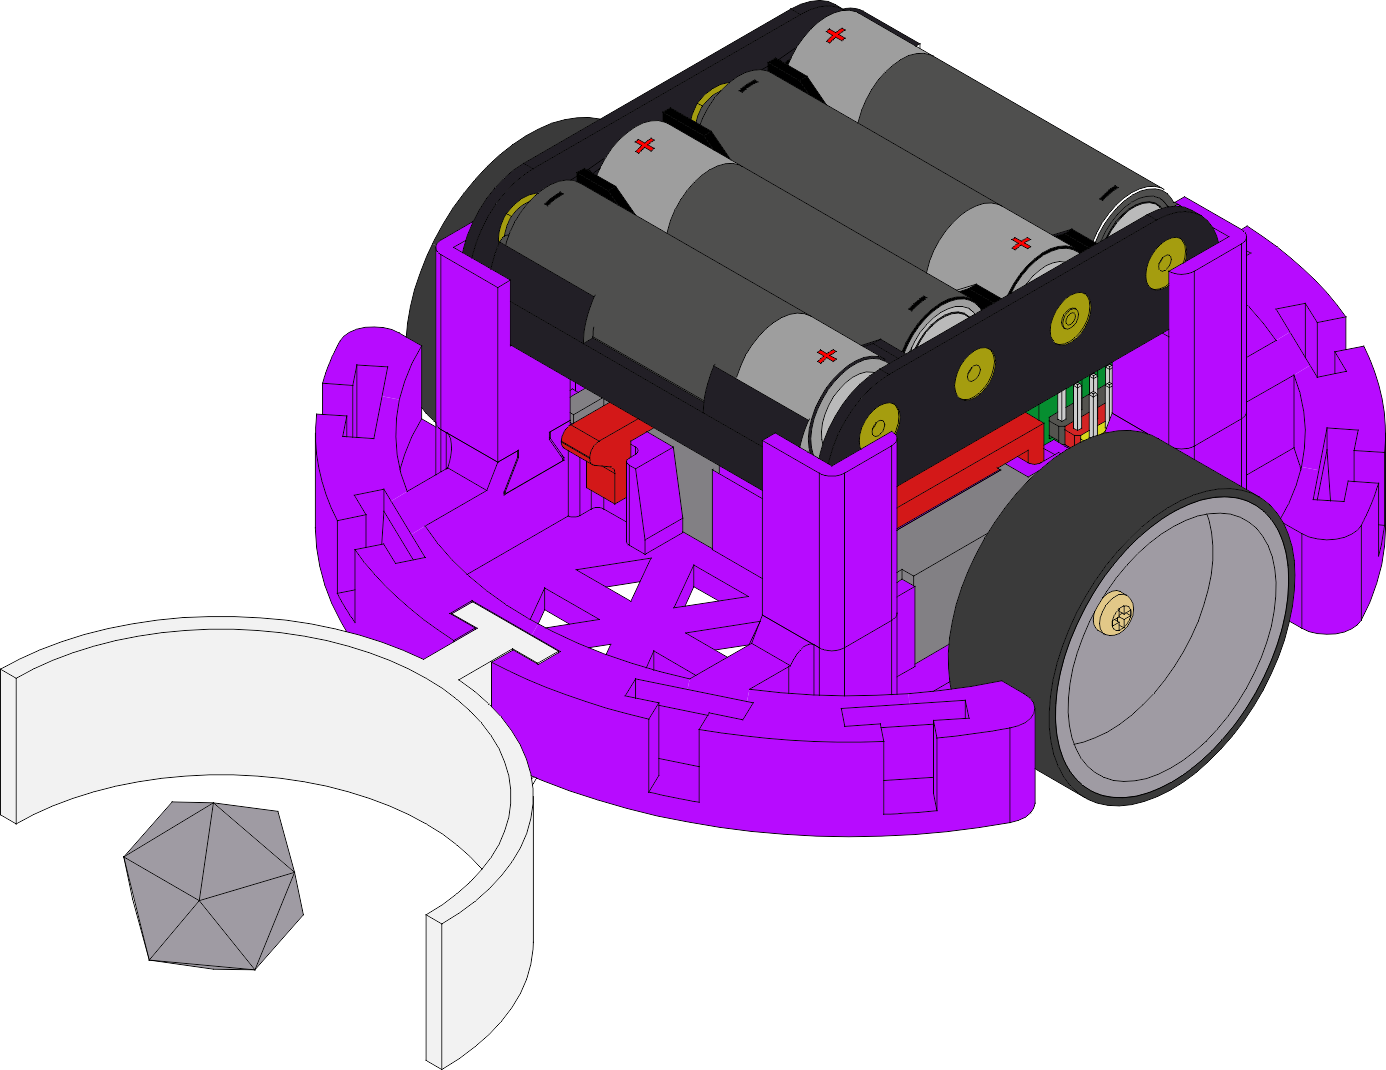
O SancaBot foi projetado para ser construído com o mínimo de parafusos e porcas, priorizando encaixes e travas plásticas. A tração é fornecida por dois micro servos 360°, conectados diretamente às rodas, aproveitando seus sistemas internos de redução. SancaBot was designed to be built with the fewest possible screws and nuts, prioritizing plastic fittings and latches. Traction is provided by two 360-degree micro servos, directly connected to wheels, taking advantage of their internal reduction systems.
Isso permite controlar os motores de forma independente para frente, trás, curvas ou rotação no próprio eixo. Na configuração inicial, o foco é o conceito puro de tração via controle remoto ou programação de tempo de movimento. This allows independent control of the motors for forward, backward, turns, or rotation on its own axis. In the initial configuration, the focus is on the pure concept of traction via remote control or movement timing programming.
Ajuste da Fonte de Alimentação Power Supply Adjustment
O ESP32C3 opera em 3.3V, mas usamos pilhas ou USB que fornecem 5V ou 6V. Ambas as placas (Super Mini e Shield) possuem reguladores de voltagem. Para um design mais confiável, isolamos os reguladores cortando o pino metálico marcado como 3V3 na lateral do ESP32-C3 antes de encaixá-lo no shield. The ESP32C3 operates at 3.3V, but we use batteries or USB providing 5V or 6V. Both boards (Super Mini and Shield) have voltage regulators. For a more reliable design, we isolate the regulators by cutting the metallic pin marked 3V3 on the side of the ESP32-C3 before fitting it into the shield.
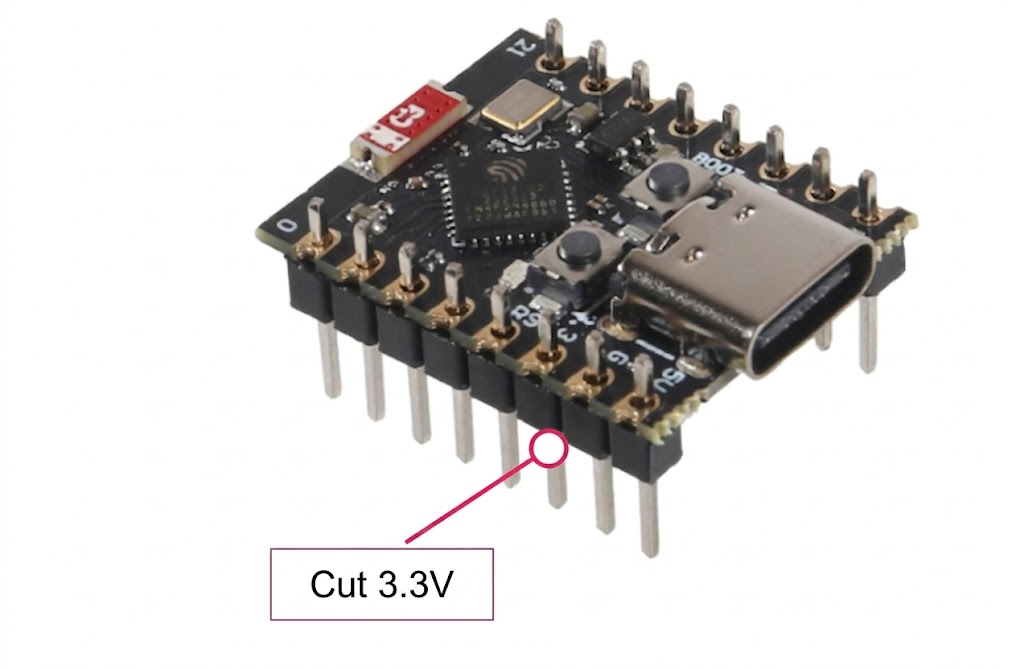
Dica: Se você comprou o kit conosco, ele já vem configurado de fábrica com o pino cortado!Tip: If you bought the kit from us, it already comes factory configured with the pin cut!
Montagem Mecânica Inicial Initial Mechanical Assembly
Agora que você entende que os motores são os "músculos", o ESP32-C3 é o "cérebro" e a bateria é o "coração", é hora de dar um corpo ao nosso robô. Now that you understand that the motors are the "muscles", the ESP32-C3 is the "brain" and the battery is the "heart", it's time to give our robot a body.
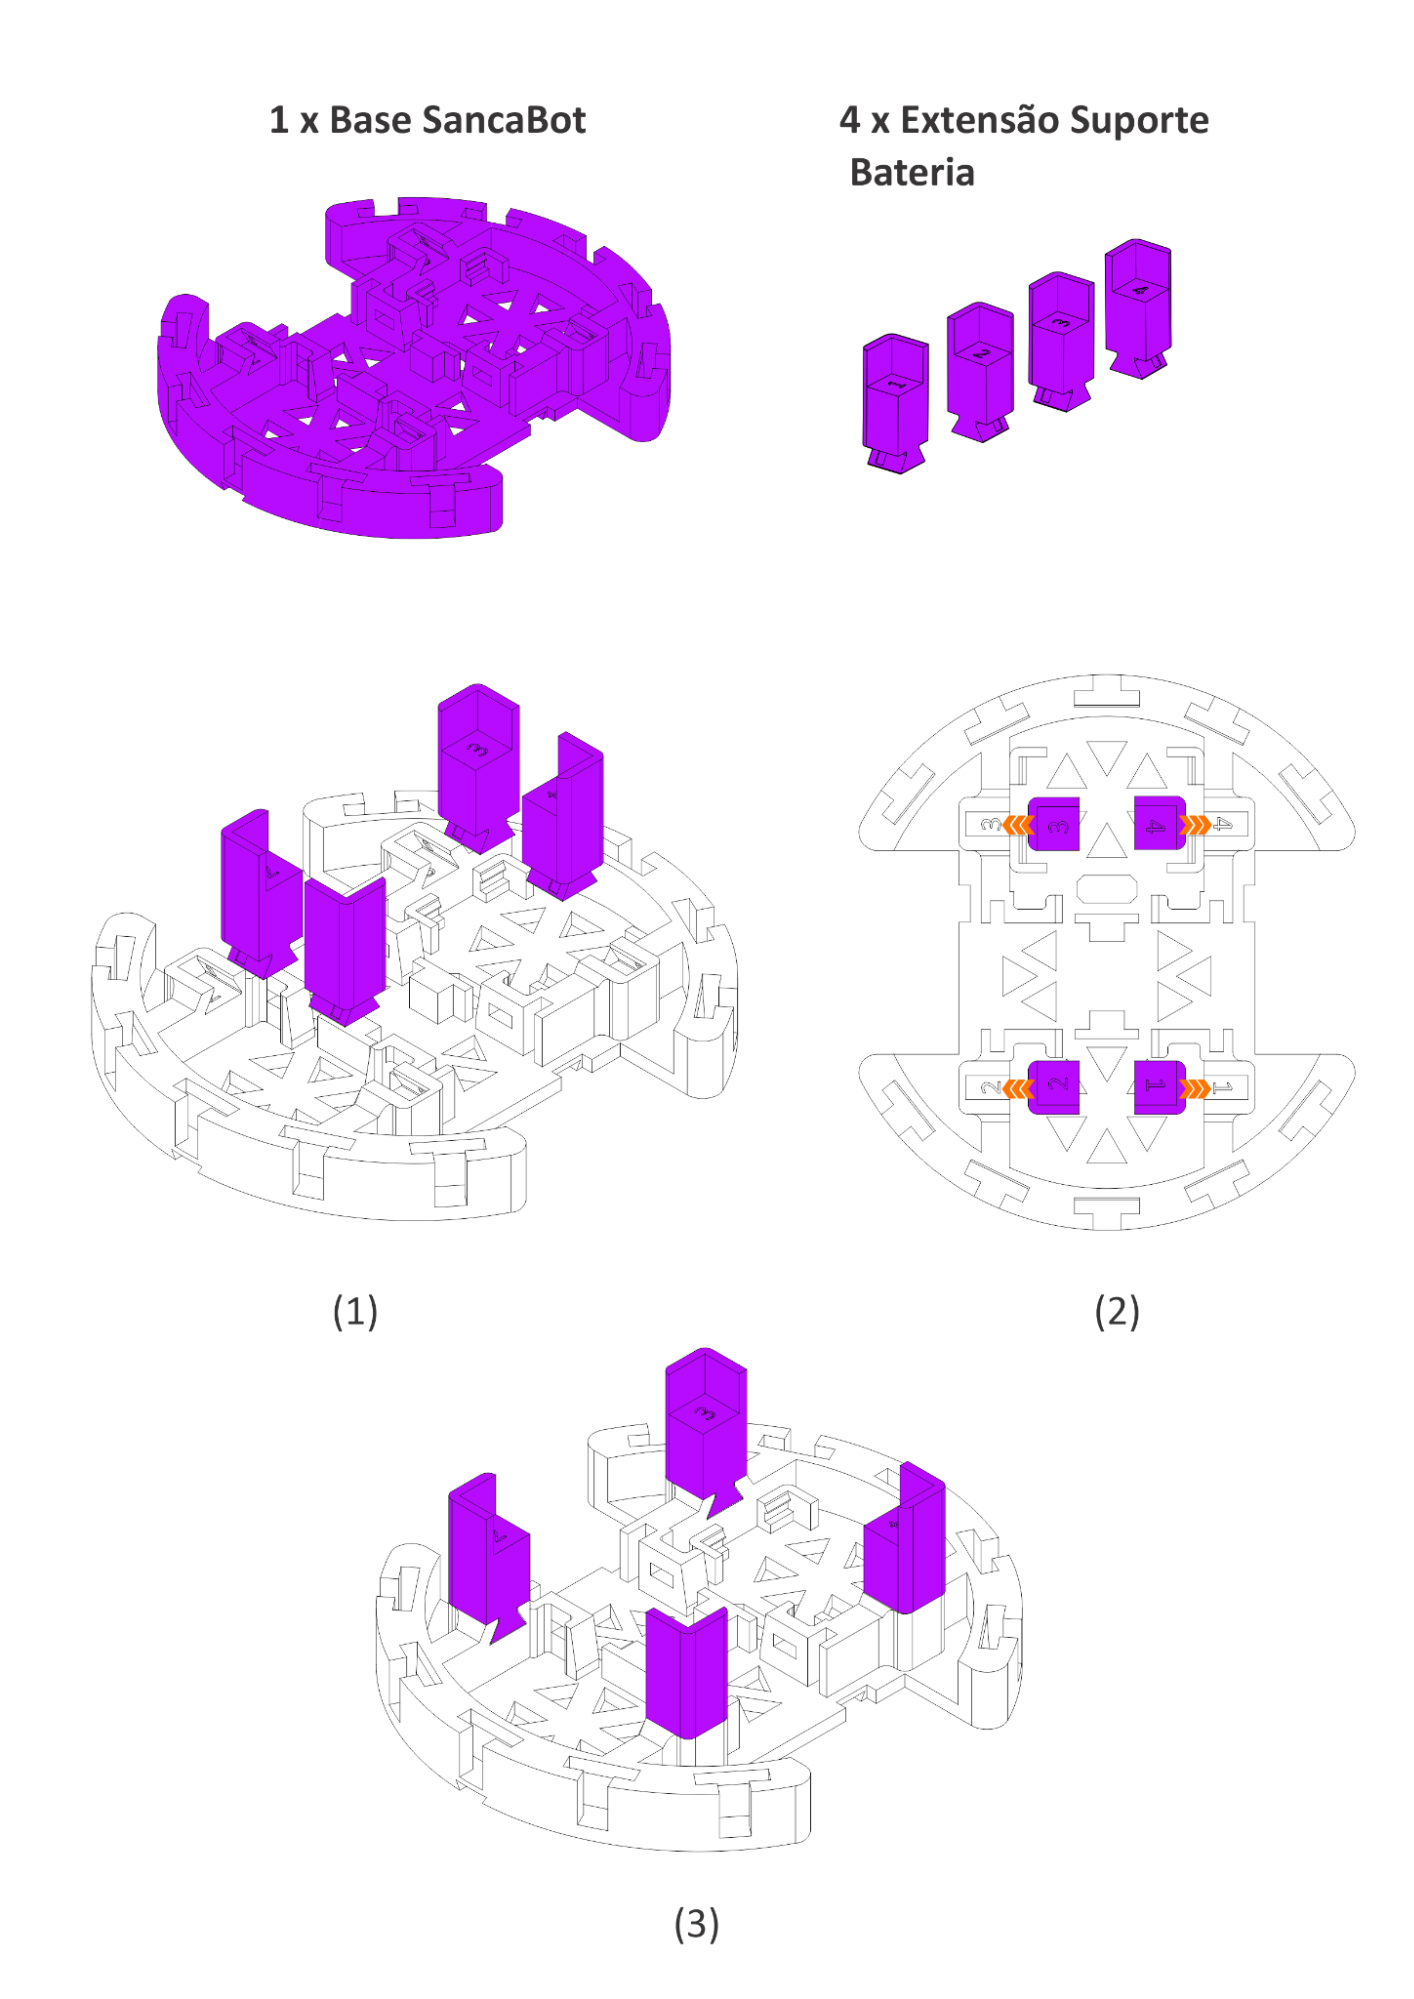
Suportes de BateriaBattery Holders
Encaixe as quatro extensões de suporte de bateria nas fendas laterais da base. Pressione até sentir que travaram firmemente. Fit the four battery support extensions into the side slots of the base. Press until they lock firmly.
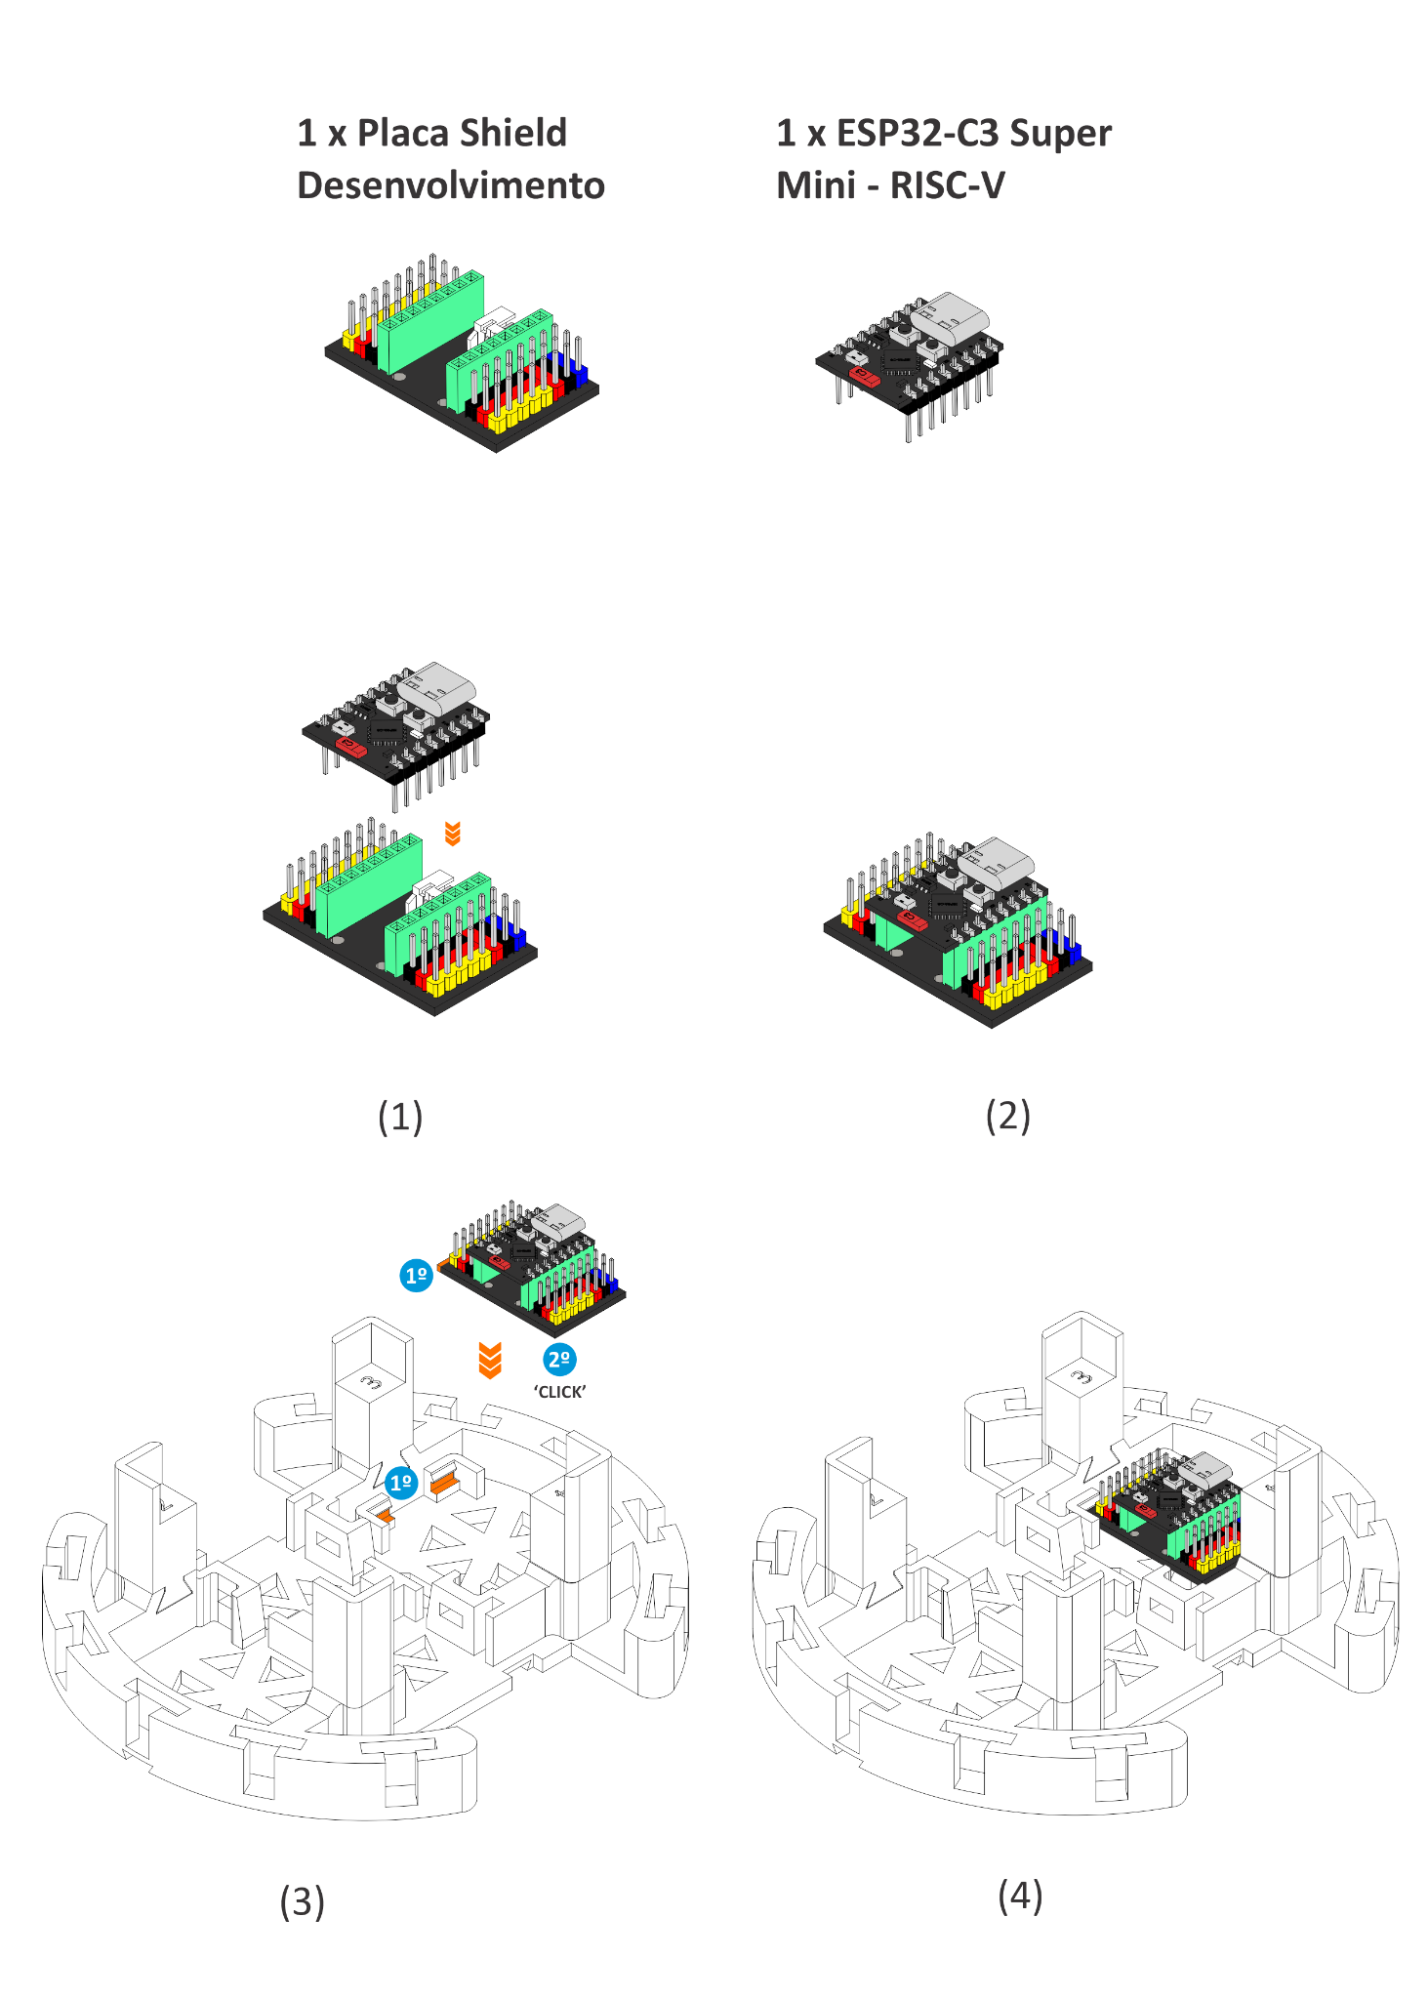
Montagem do CérebroBrain Assembly
Encaixe o ESP32-C3 na placa Shield, alinhando todos os pinos cuidadosamente. Em seguida, prenda o conjunto na base do SancaBot até ouvir o 'CLICK' de travamento. Fit the ESP32-C3 onto the Shield board, aligning all pins carefully. Then, attach the assembly to the SancaBot base until you hear the locking 'CLICK'.
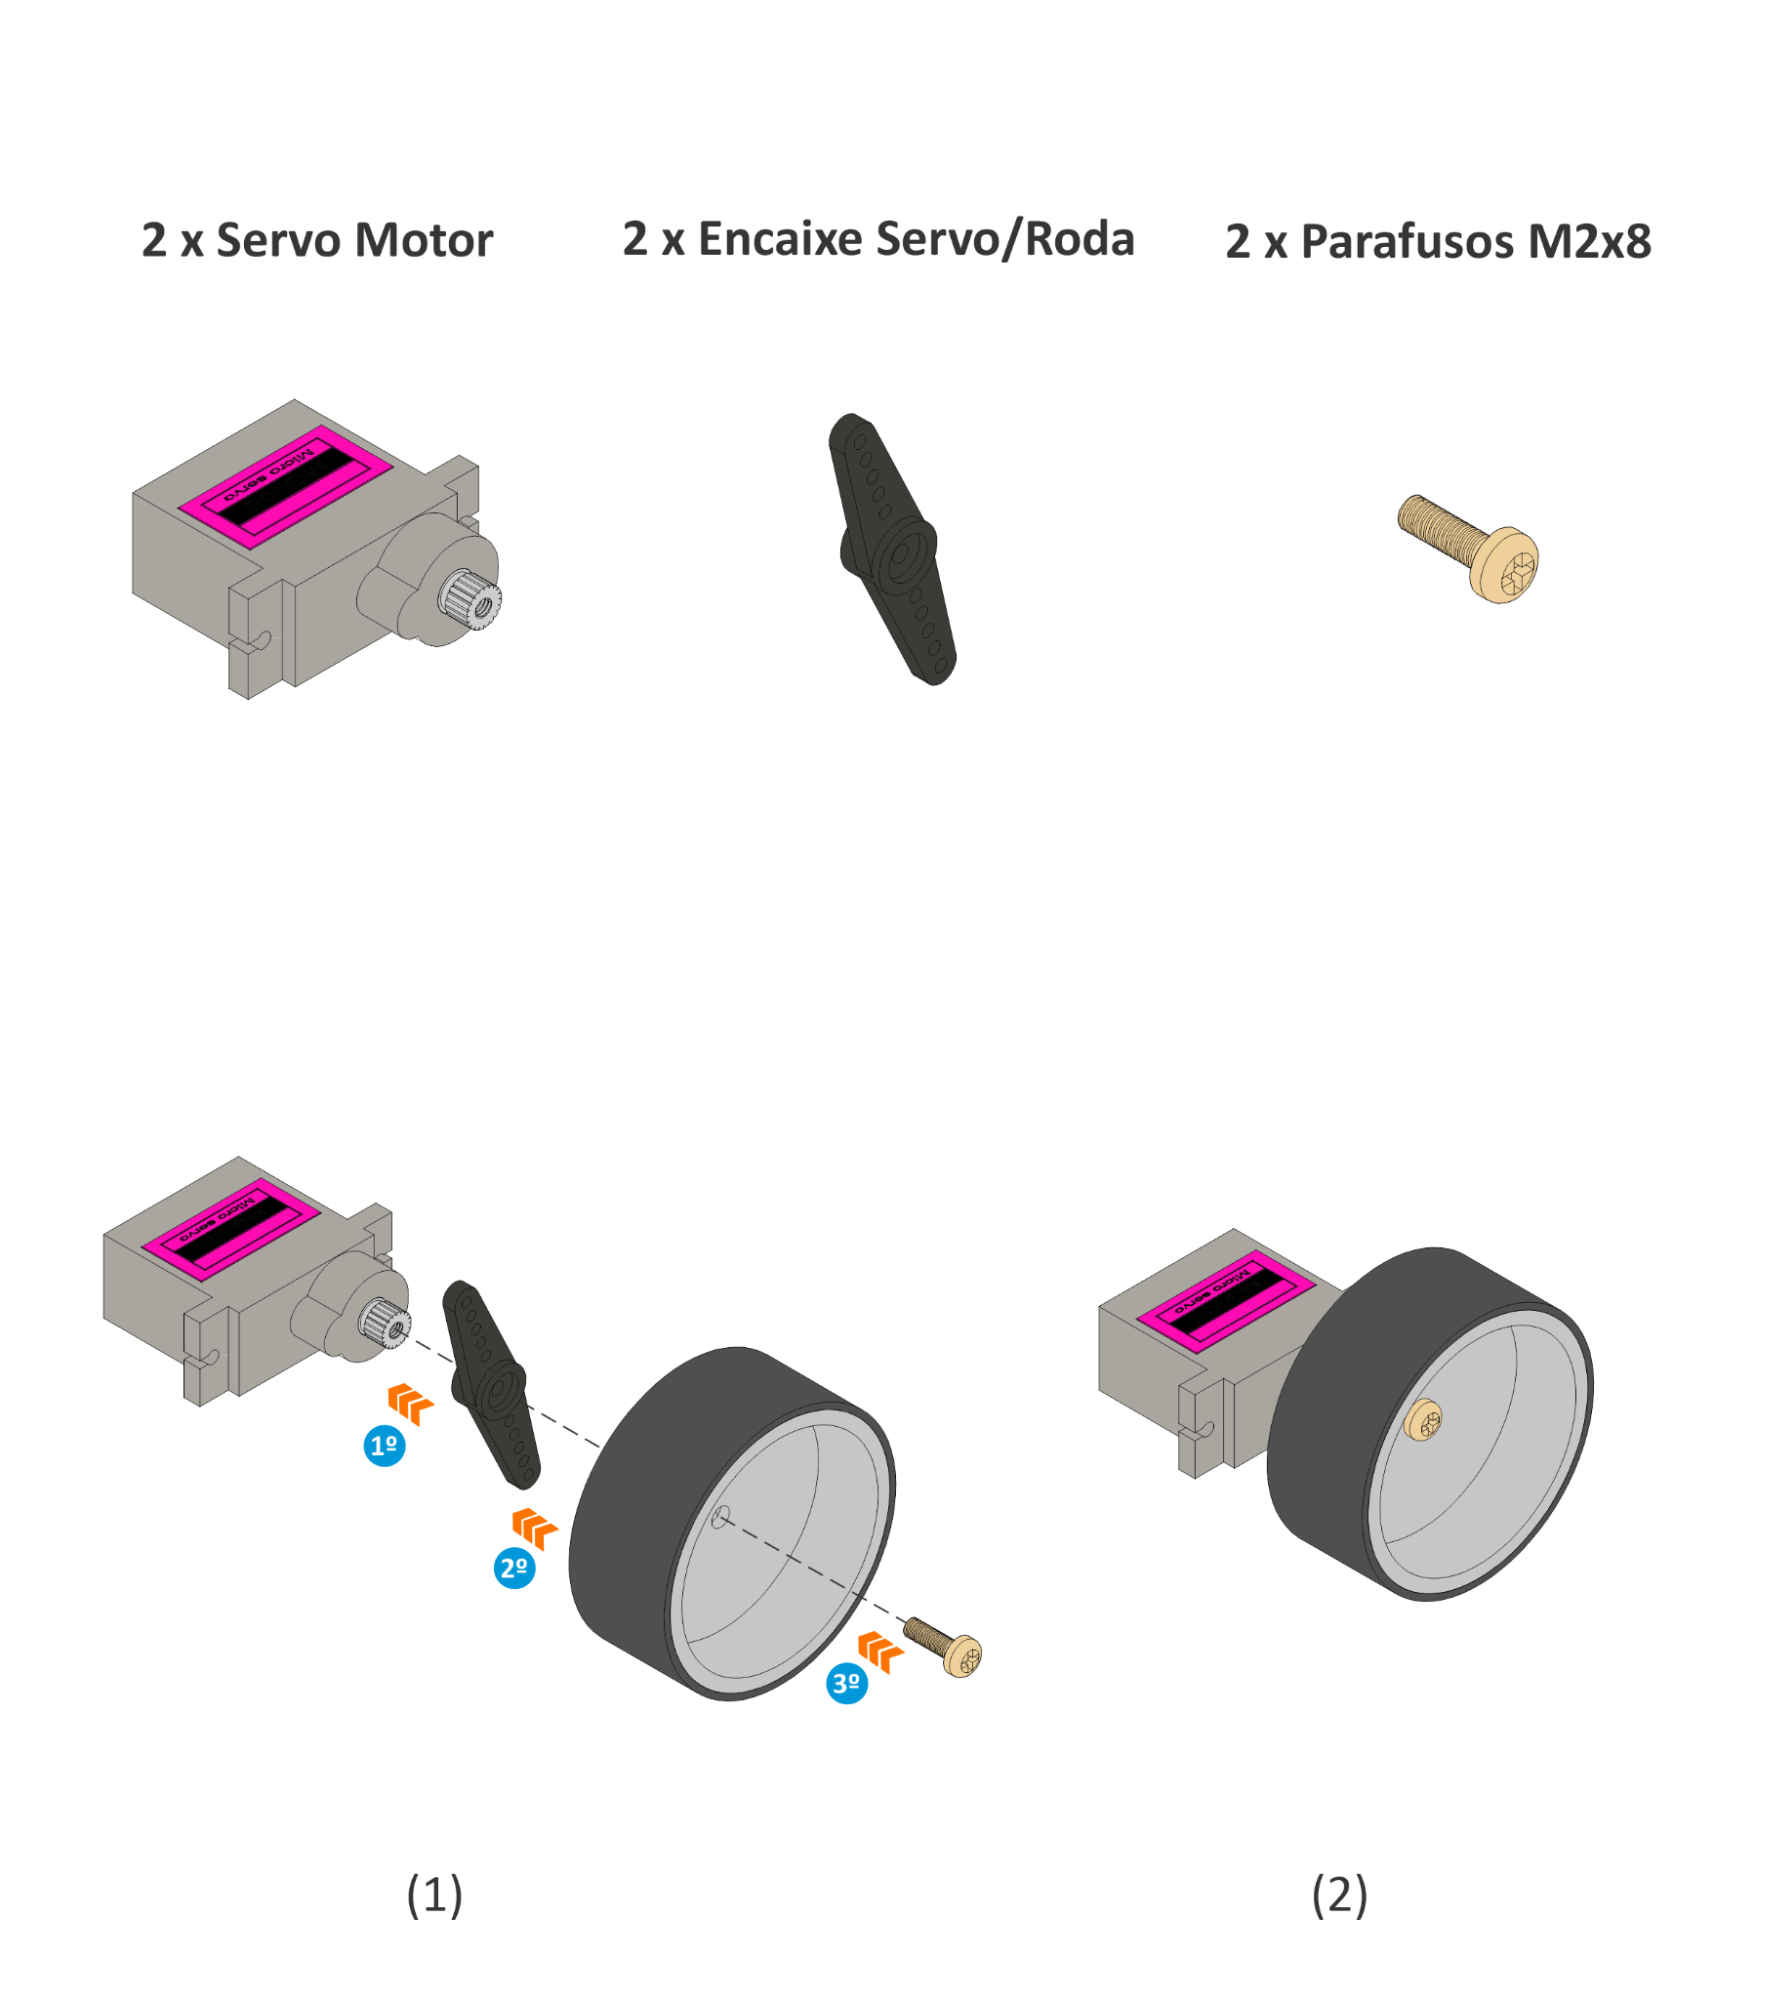
Motores e RodasMotors and Wheels
Fixe o adaptador servo/roda no eixo de cada servo. Encaixe a roda no adaptador e prenda com o parafuso M2x8. Aperte bem: uma roda solta comprometerá o movimento do robô. Attach the servo/wheel adapter to the shaft of each servo. Attach the wheel to the adapter and secure it with the M2x8 screw. Tighten firmly: a loose wheel will compromise the robot's movement.
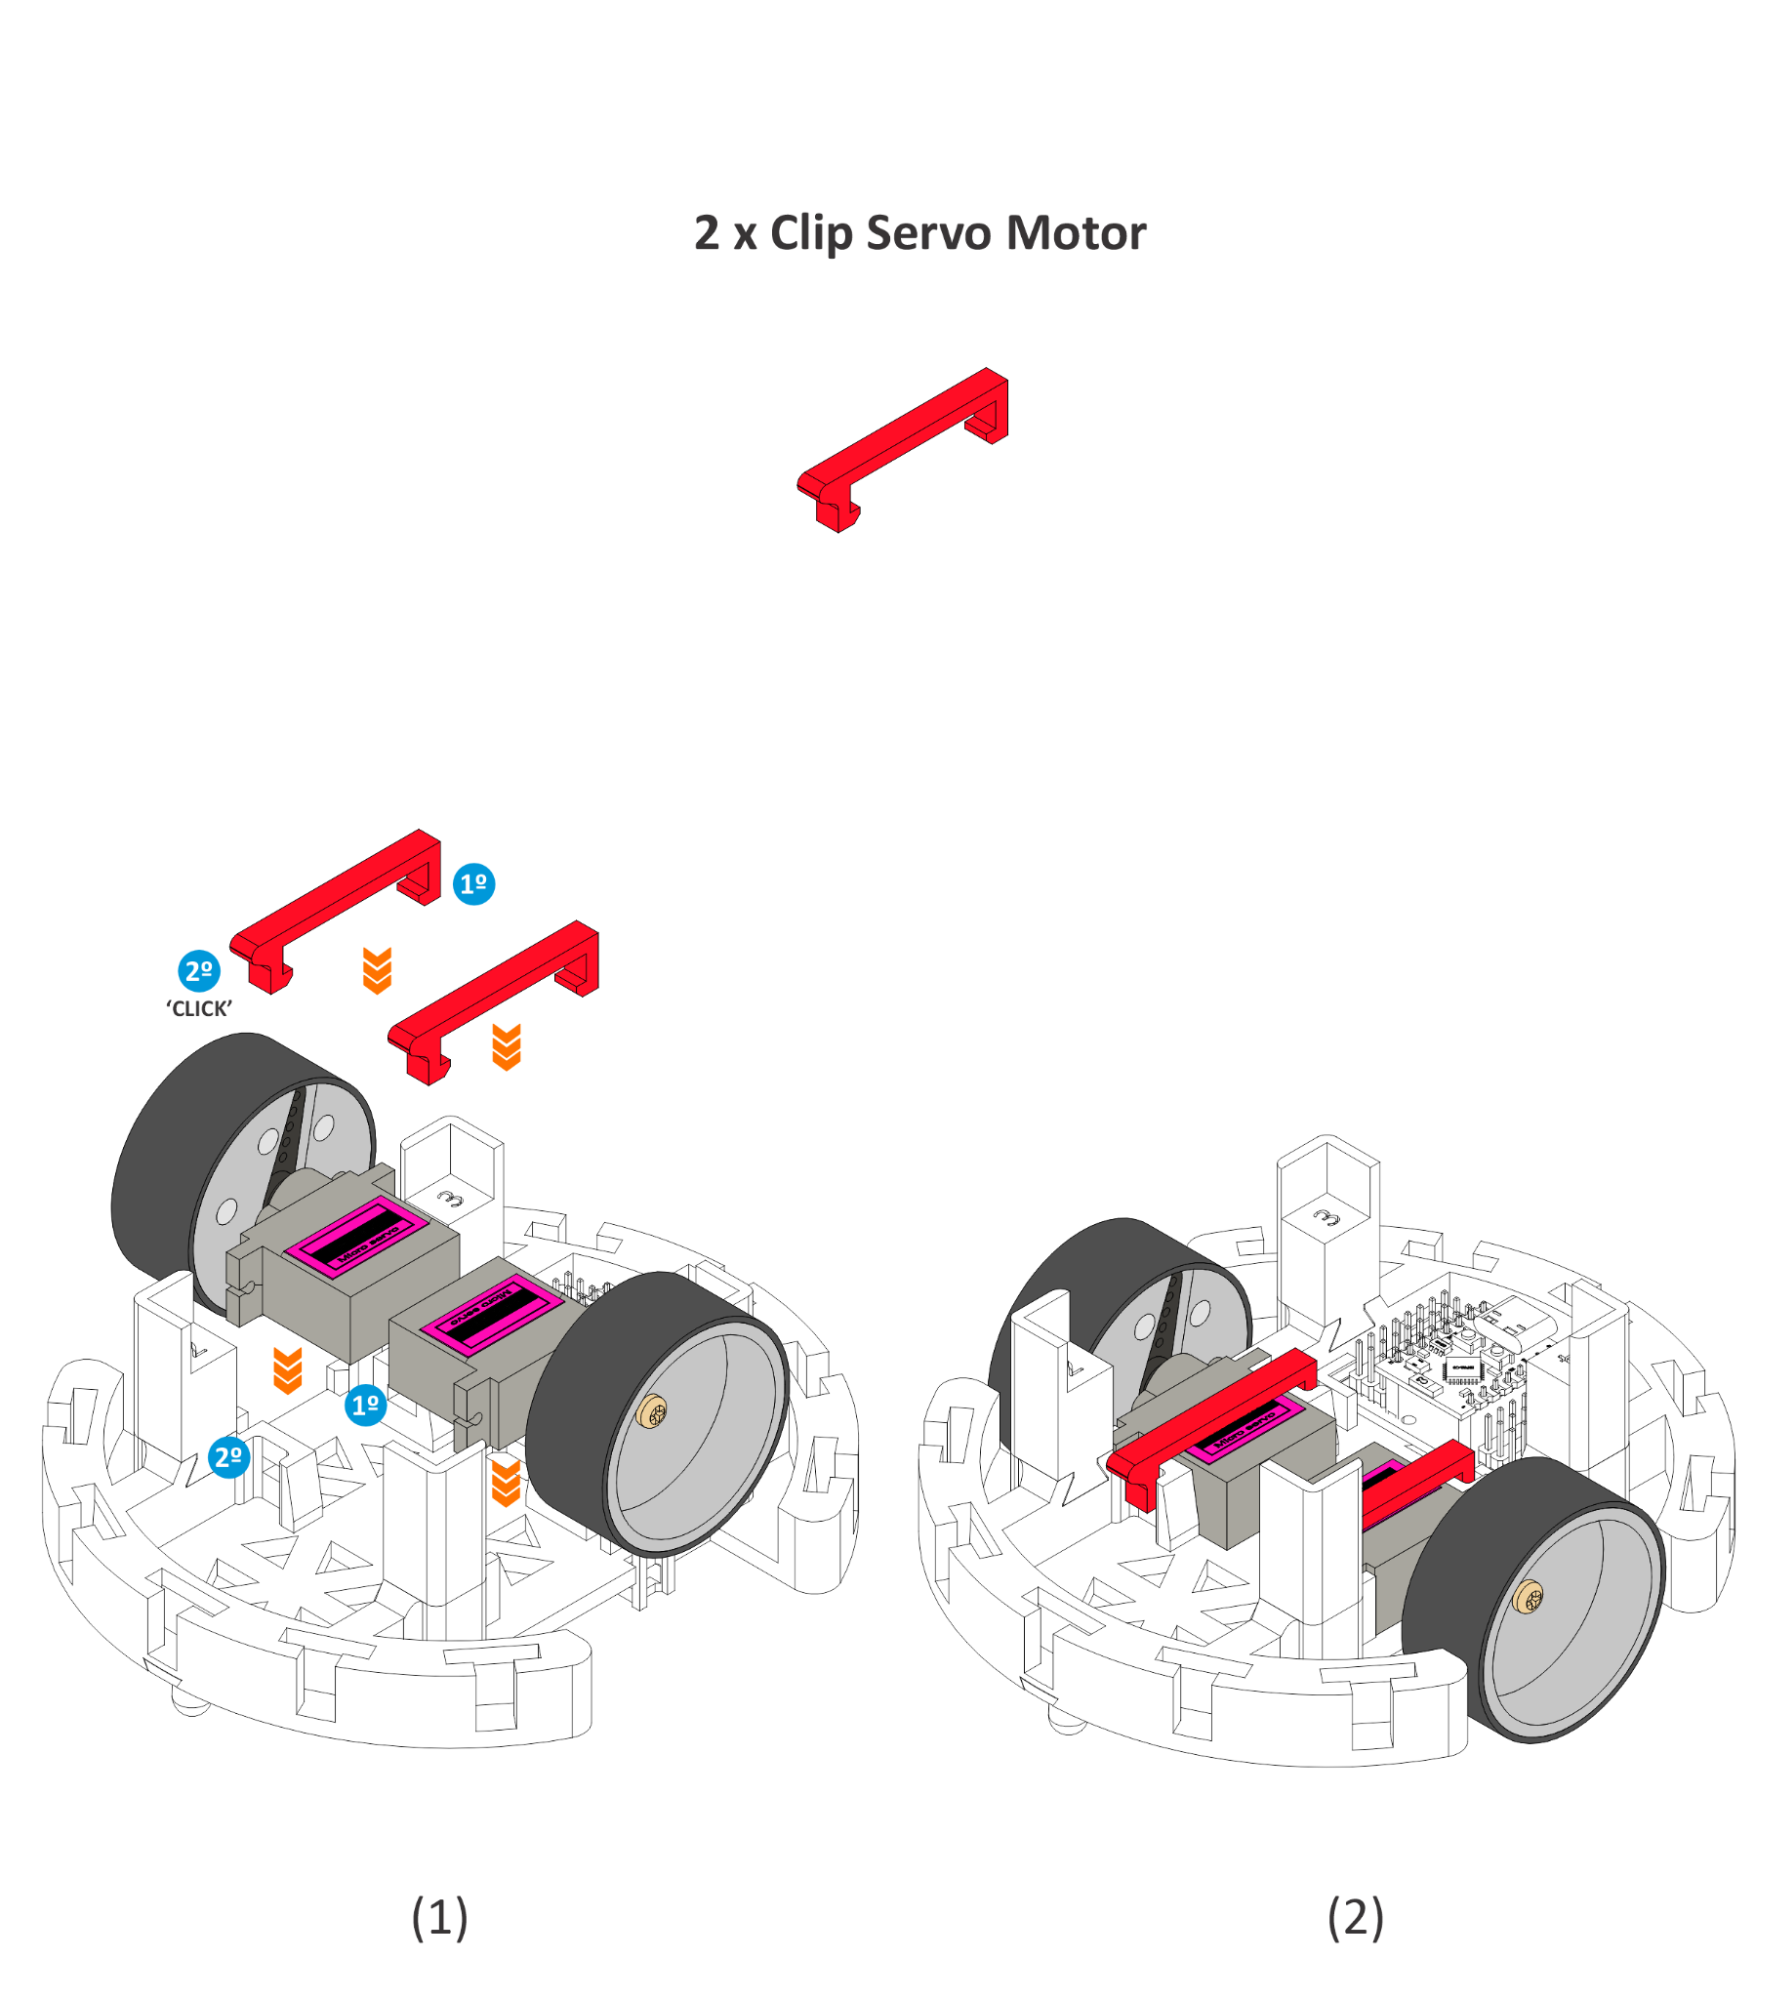
Fixação dos ServosSecuring the Servos
Posicione cada servo com a roda montada nas laterais da base. Coloque os clips vermelhos sobre cada servo, pressionando até ouvir o clique de travamento em ambos os lados. Position each servo with the wheel mounted on the sides of the base. Attach the red clips over each servo, pressing until you hear the locking click on both sides.
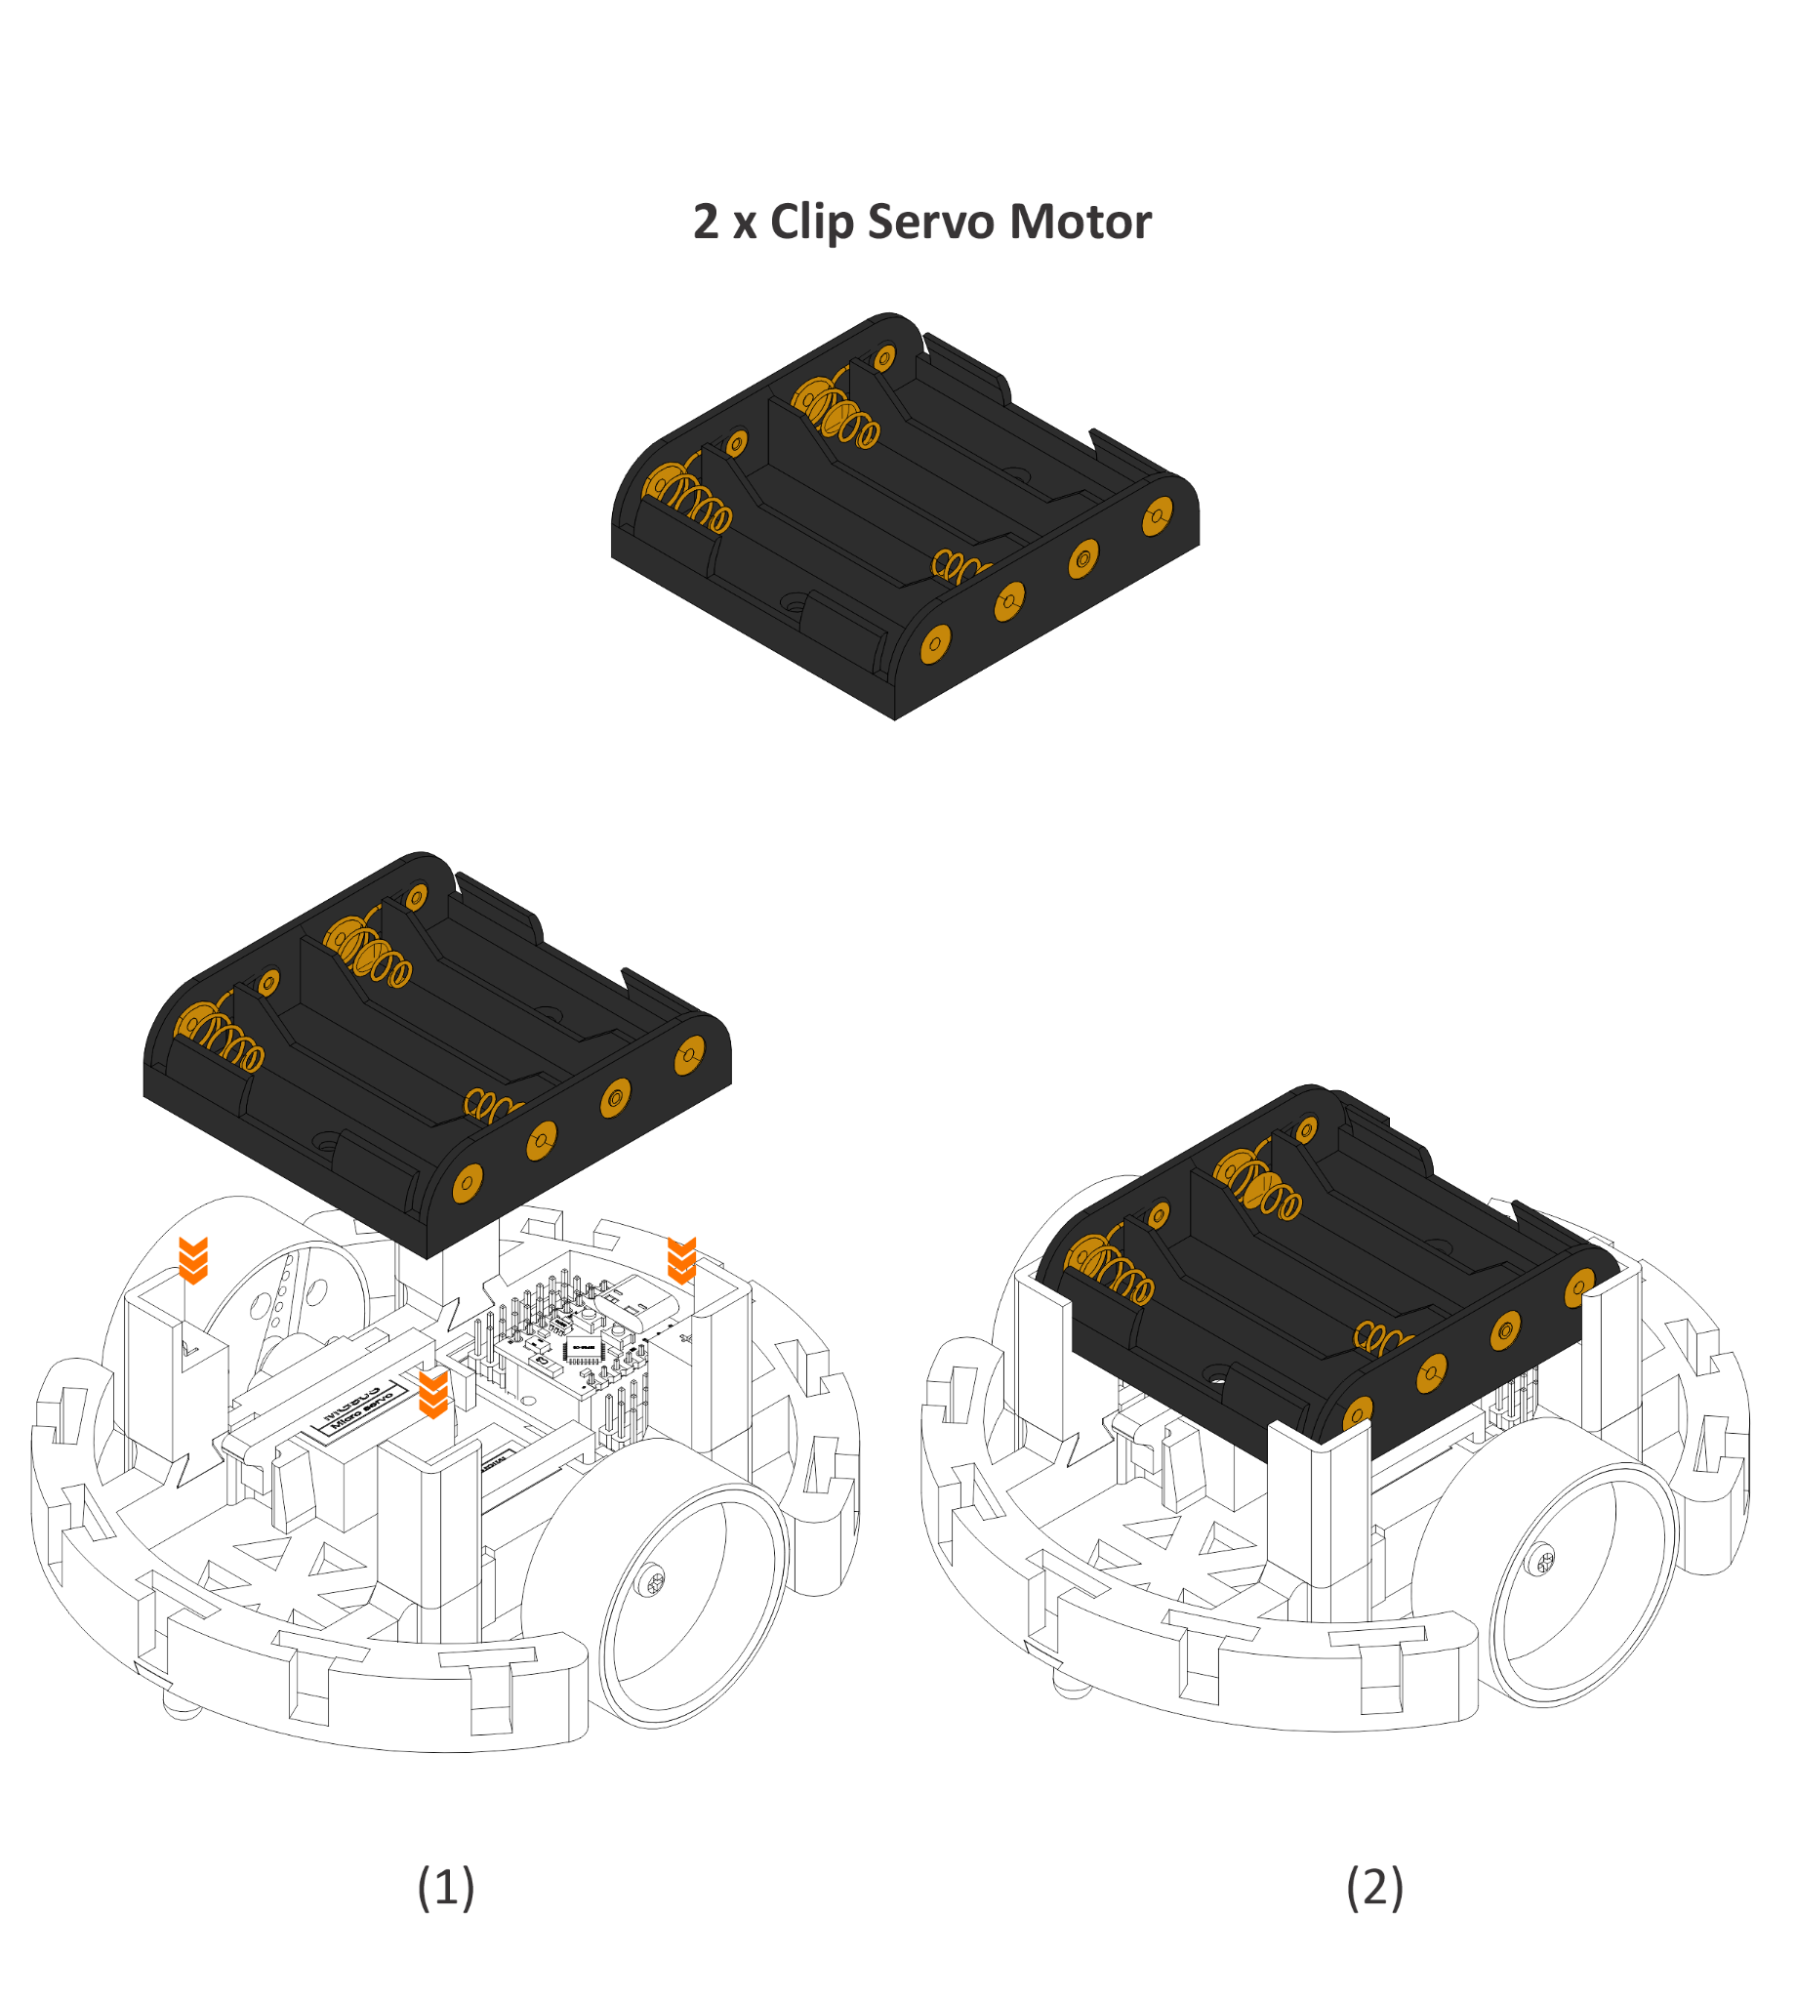
Suporte de Bateria FinalFinal Battery Support
Prenda o suporte de pilhas na parte traseira superior do chassi, alinhando com os pinos de montagem. Pressione até travar. A montagem mecânica está completa! Attach the battery holder to the upper rear of the chassis, aligning with the mounting pins. Press until it locks. The mechanical assembly is complete!
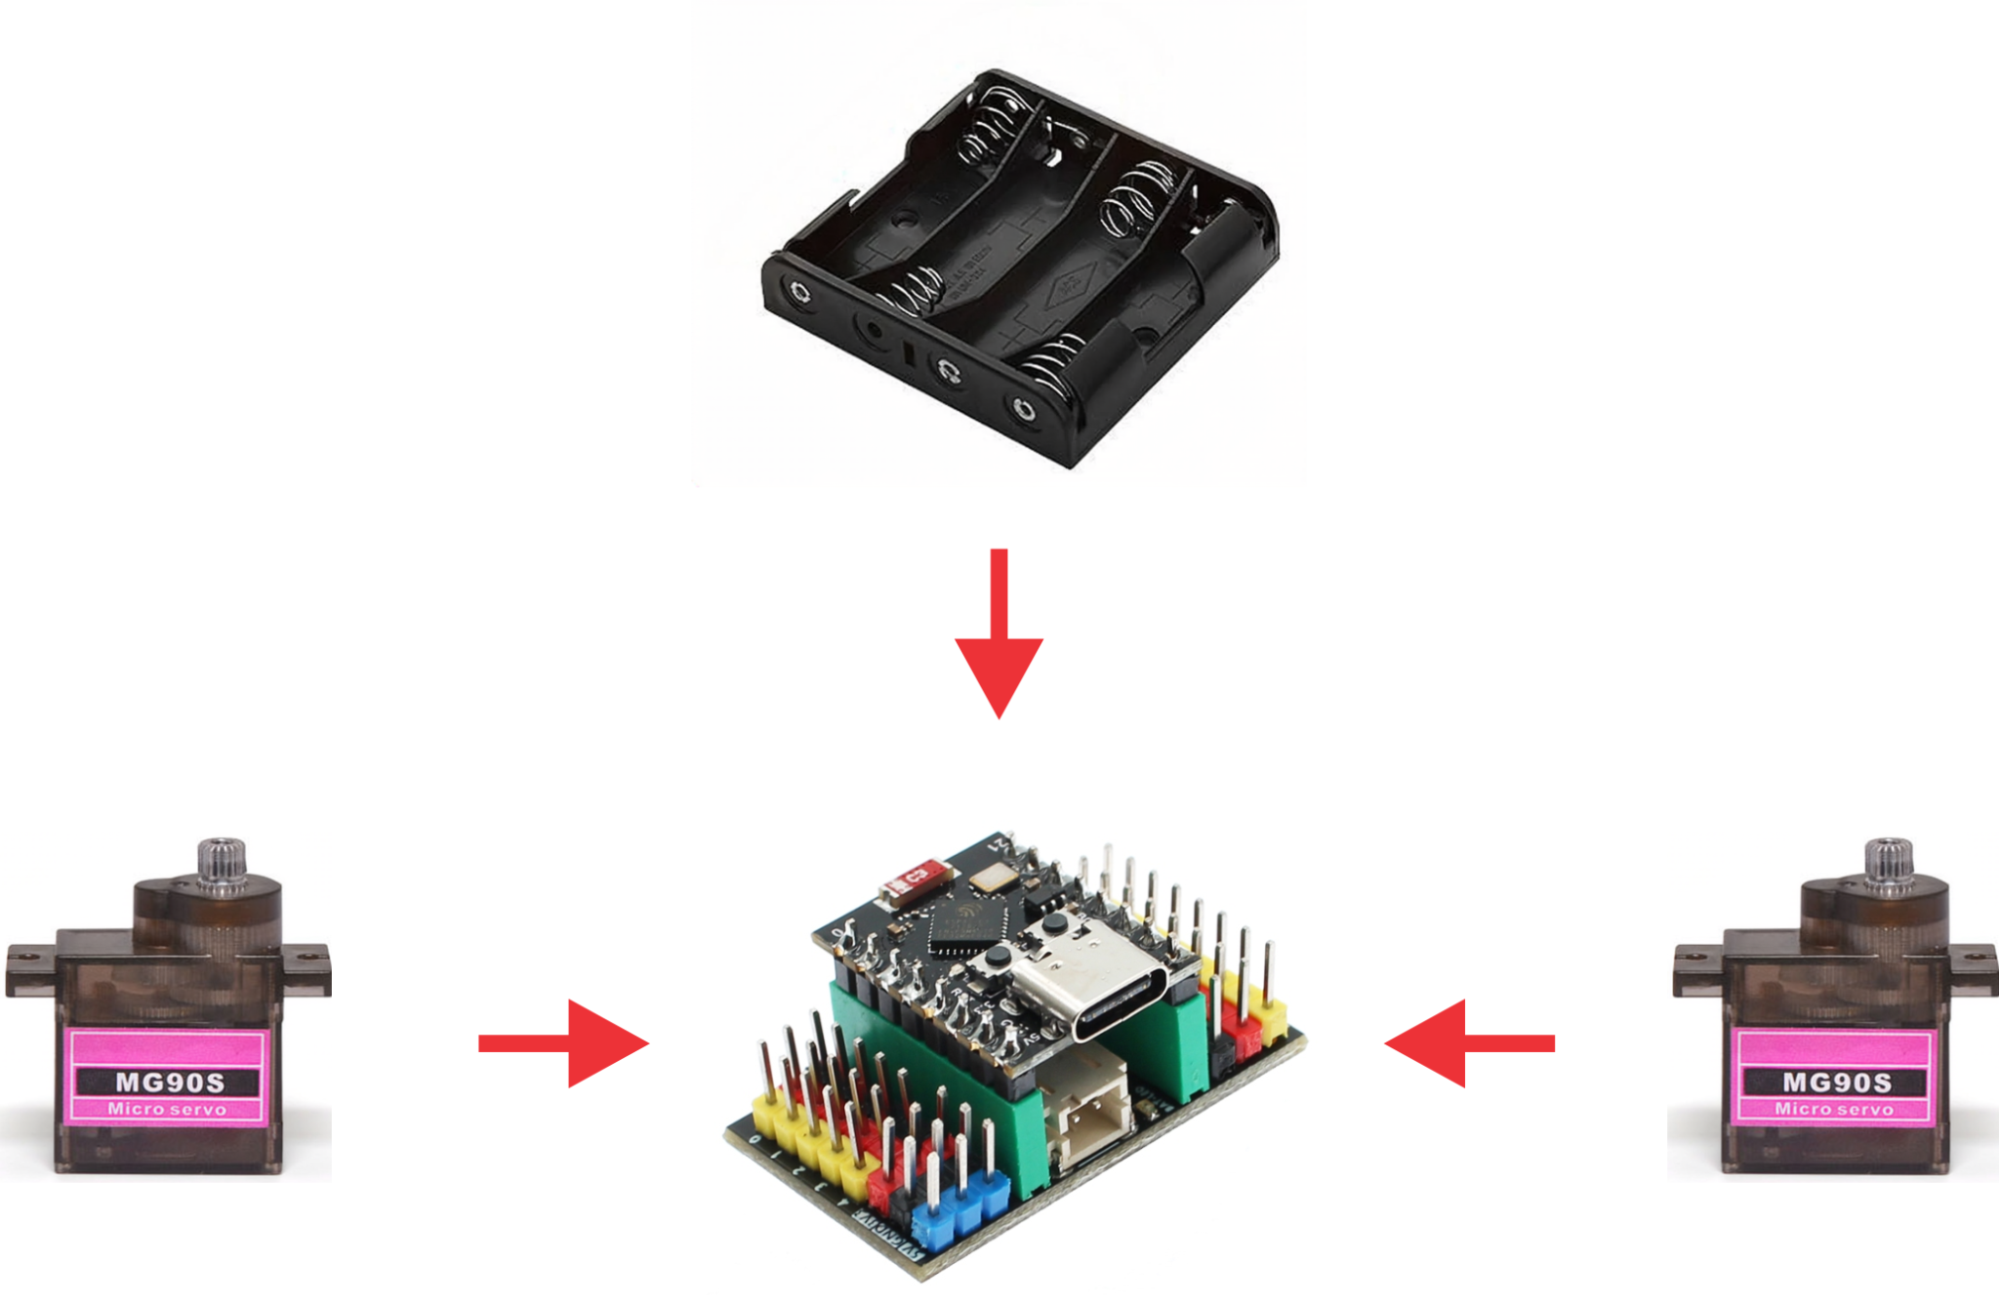
Montagem Eletrônica Inicial Initial Electronic Assembly
Nesta fase, conectaremos os itens essenciais: baterias, motores e o controlador. Veja o mapa de conexões abaixo: In this stage, we will connect the essential items: batteries, motors, and controller. See the connection map below:
| ComponenteComponent | Pino GPIOGPIO Pin |
|---|---|
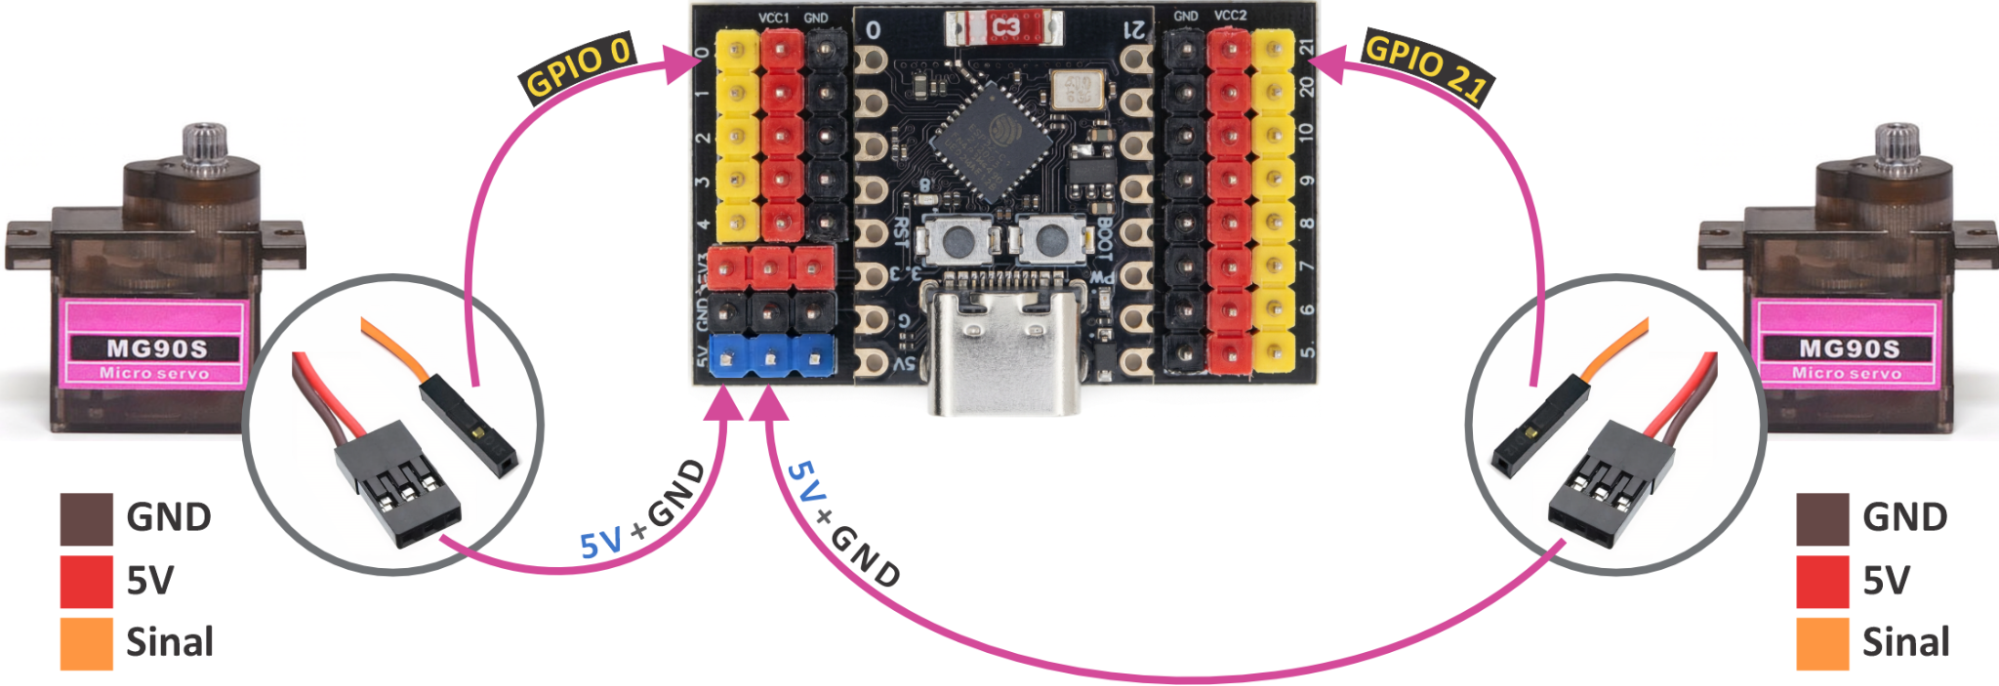
| Servo Esquerdo (Sinal) | GPIO 0 |
| Servo Direito (Sinal) | GPIO 21 |
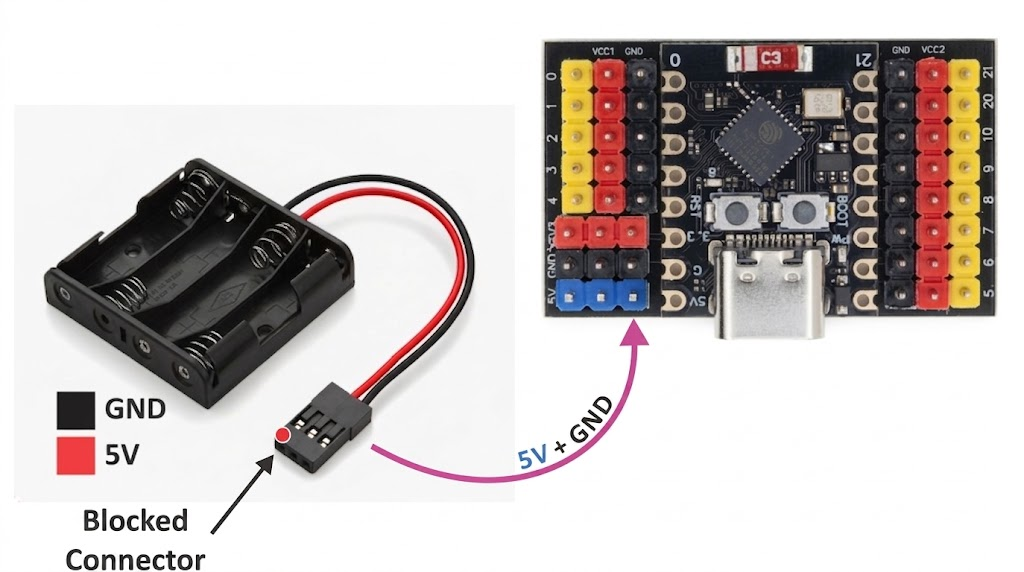
Conexão da BateriaBattery Connection
Opção A (Kit Sanca Labs): O conector MODU de 3 vias já vem preparado com trava anti-reverso. Se não entrar fácil, verifique a posição. Option A (Sanca Labs Kit): The 3-way MODU connector is already prepared with an anti-reverse lock. If it doesn't go in easily, check the position.
Opção B (Montagem Própria): Use um conector MODU de 2 vias. Fio vermelho (+) no 5V/VIN e fio preto (-) no GND. Cuidado: sem proteção física, inverter a polaridade danificará o ESP32 permanentemente! Option B (Self-Assembly): Use a 2-way MODU connector. Red wire (+) to 5V/VIN and black wire (-) to GND. Warning: without physical protection, reversing polarity will permanently damage the ESP32!
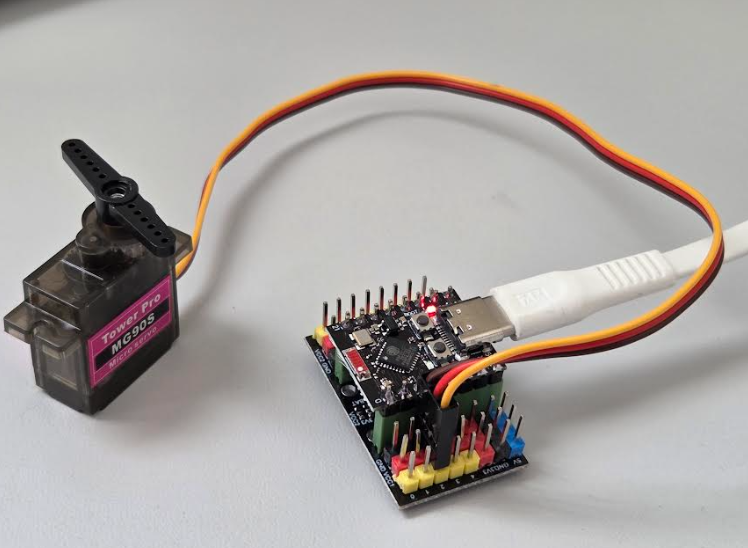
Conexão dos ServosServo Connection
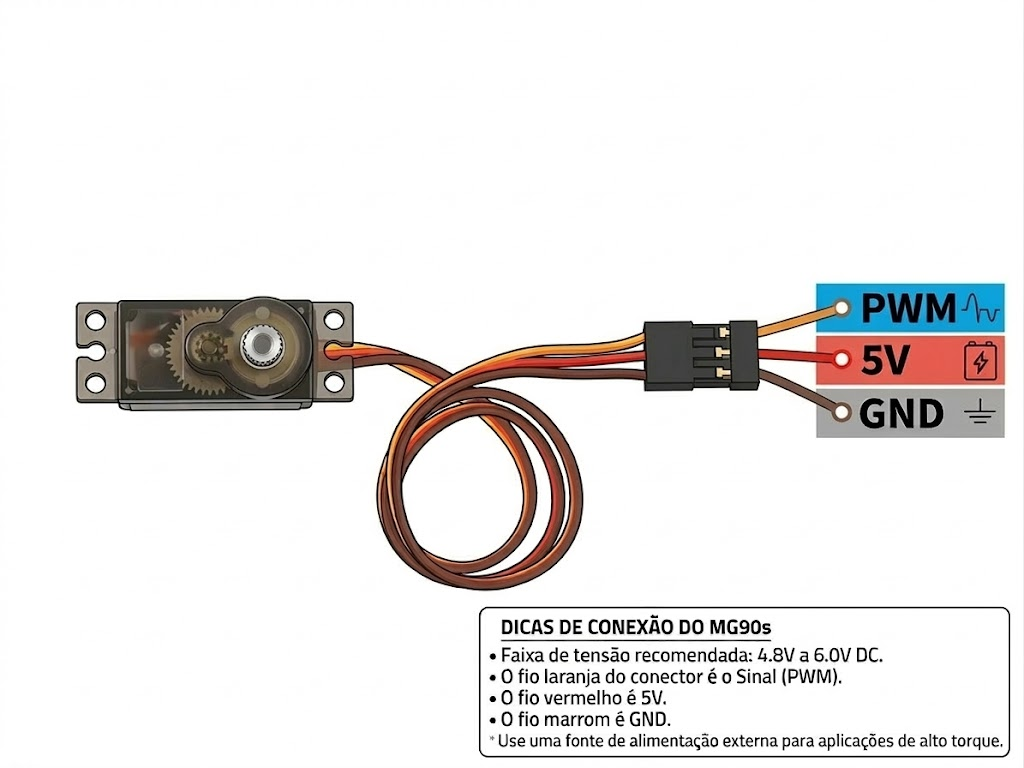
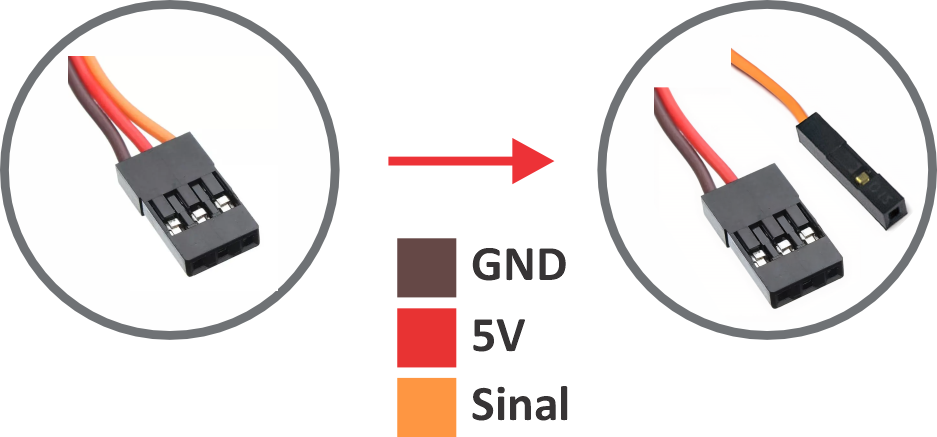
O ESP32-C3 opera em 3.3V, mas os servos precisam de 4.5V a 6V para força adequada. Conectá-los em 3.3V resultará em movimentos fracos. The ESP32-C3 operates at 3.3V, but servos need 4.5V to 6V for adequate torque. Connecting them to 3.3V will result in weak movements.
Option 1: Direto (Original)Direct (Original)
Cabo original de 3 vias no barramento. Fio marrom no GND, fio laranja no sinal.Original 3-way cable. Brown wire to GND, orange wire to signal.
Option 2: Adaptado (Melhor Torque)Adapted (Best Torque)
Separe o fio de sinal (laranja) em um conector de 1 via e ligue no GPIO. Alimentação vai no barramento 5V.Separate the signal wire (orange) into a 1-way connector to GPIO. Power goes to 5V bus.
Controle Remoto Bluetooth Bluetooth Remote Control
Se você adquiriu o kit Sanca Labs, o firmware já vem pré-instalado. Basta ligar as pilhas (o LED do ESP32 acenderá) e seguir os passos de conexão abaixo. If you purchased the Sanca Labs kit, the firmware is pre-installed. Just turn on the batteries (ESP32 LED will light up) and follow the connection steps below.
Montagem Própria — Um passo adicionalSelf-Assembly — One more step
Se você montou o SancaBot com componentes comprados separadamente, primeiro é necessário gravar o firmware de controle remoto no ESP32-C3. Faça isso via USB, antes de inserir as pilhas. If you assembled SancaBot using separately purchased components, you first need to flash the remote control firmware onto the ESP32-C3. Do this via USB, before inserting the batteries.
Acesse a ferramenta AIPES ou BIPES no seu navegador: Access the AIPES or BIPES tool in your browser:
Siga as instruções na página para gravar o firmware. Após a gravação, desconecte o USB, insira as pilhas e siga para o passo 8. Follow the instructions on the page to flash the firmware. After flashing, disconnect the USB, insert the batteries, and proceed to step 8.
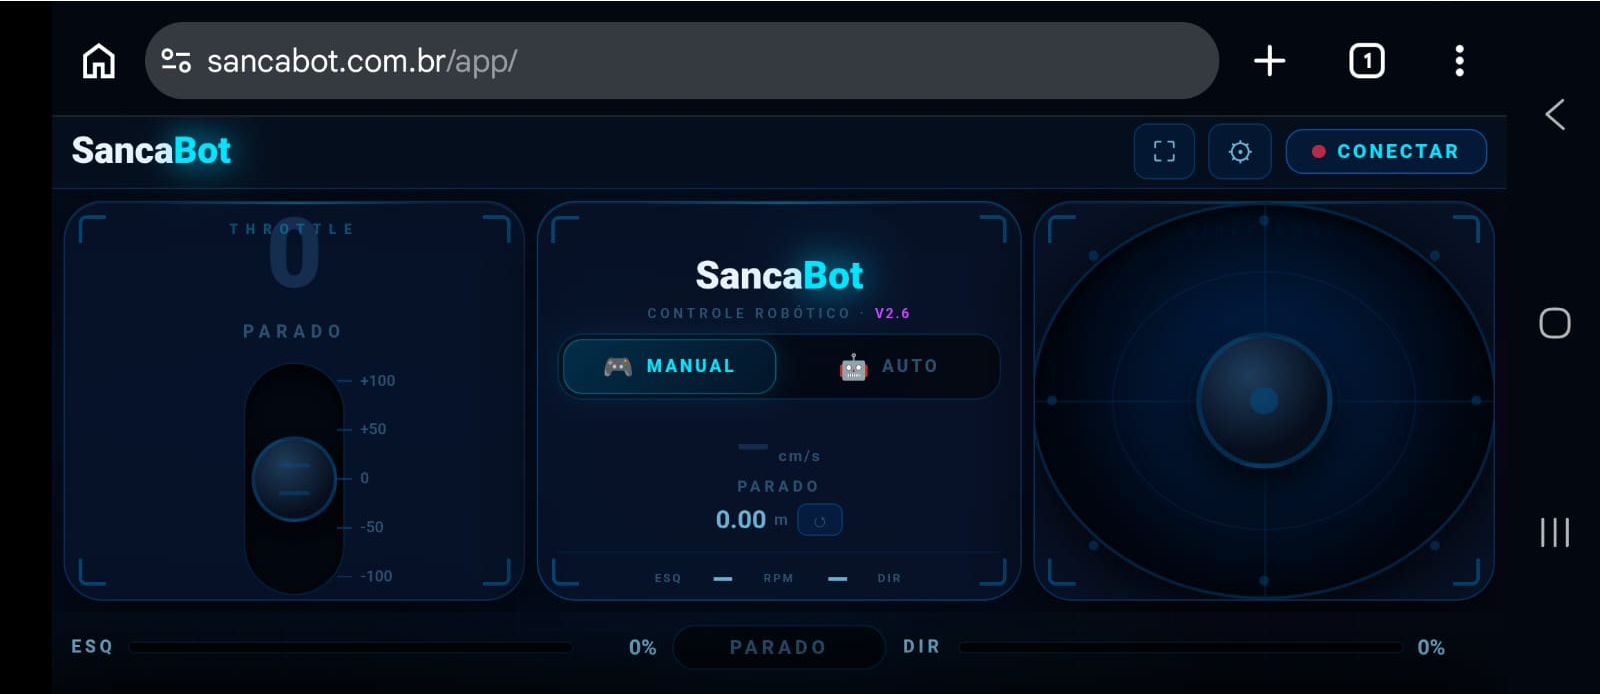
Conectar e DirigirConnect and Drive
- Acesse sancabot.com.br/app no navegador (Android/iOS).Access sancabot.com.br/app in browser (Android/iOS).
- Toque no ícone de tela cheia
 se desejar.Tap full-screen icon if desired.
 - Clique em Connect e selecione o dispositivo "SancaBot".Click Connect and select "SancaBot" device.
- Use o joystick na tela para mover o robô!Use the on-screen joystick to move the robot!
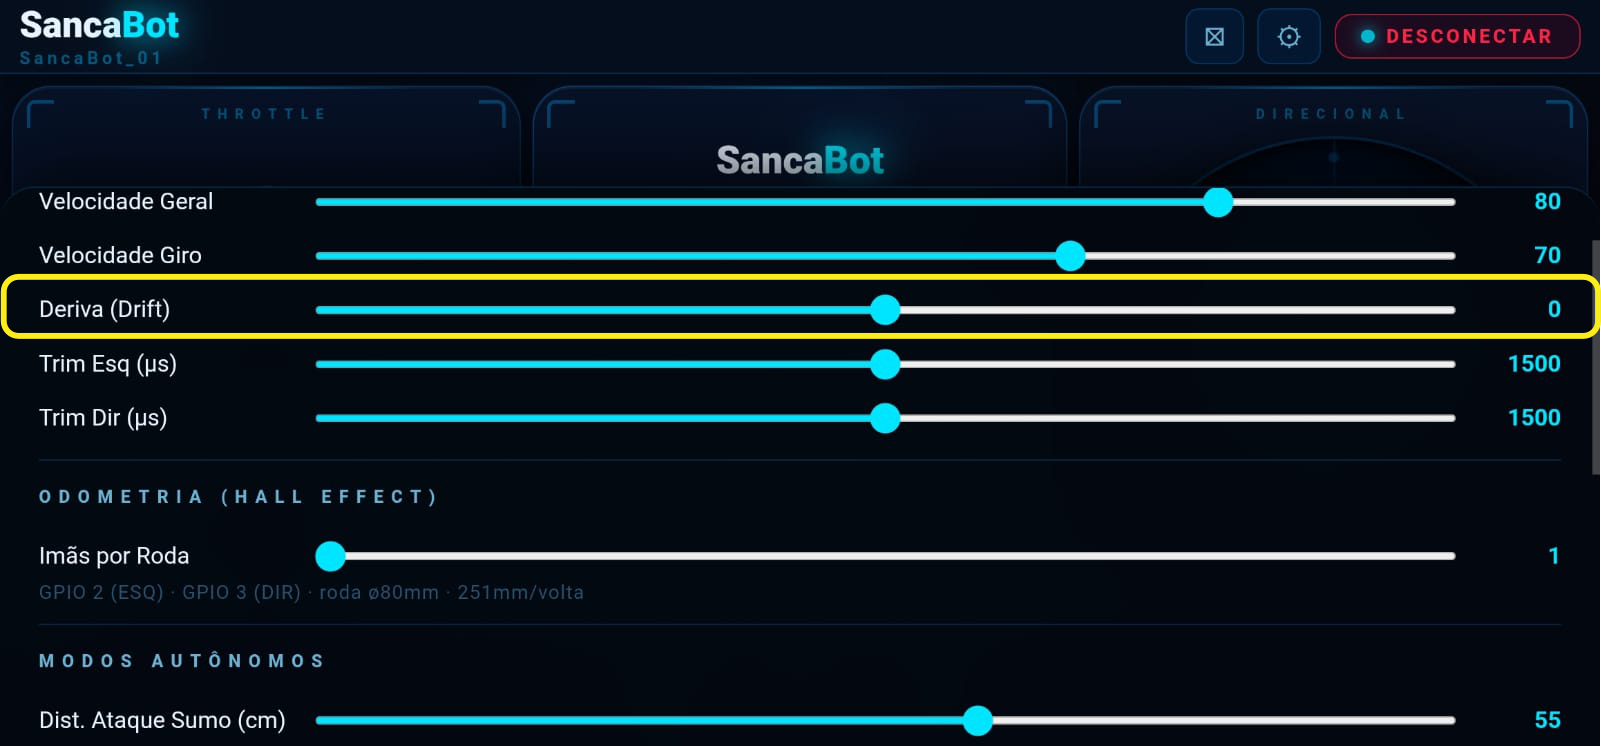
Calibração de DriftDrift Calibration
É normal que o robô não ande em linha reta absoluta devido a variações nos servos. A correção é feita no app: clique na engrenagem, ajuste o controle de "Drift" (positivo ou negativo conforme o desvio) e clique em APPLY TO THE ROBOT. It's normal for the robot not to walk in an absolute straight line due to servo variations. Correction is done in the app: click the gear, adjust "Drift" (positive or negative depending on drift), and click APPLY TO THE ROBOT.
Quer aprofundar seu conhecimento?Want to deepen your knowledge?
Temos kits prontos e o Livro Mestre Definitivo em nossa loja oficial! We have ready-made kits and the Ultimate Master Book in our official store!
Comprar Livro e Kits Oficiais Buy Official Book and Kits
Comentários da Comunidade Community Comments